This article originally appeared on Medium.
So, we've all heard of Kubernetes by now. It's a container orchestration platform that's currently taking over the world (and cloud), originally designed by Google and now maintained by the Cloud Native Computing Foundation. It provides an abstraction layer over hardware resources making it easier for both development and infrastructure teams to scale out applications.
The classic approach
That being said, Kubernetes by itself does not offer that much in terms of true automatic scaling. Of course, we can’t take for granted the work that has gone into the Cluster Autoscaler and Horizontal Pod Autoscaler which will be the foundation of the event driven approach covered in the second half of this blog.
Horizontal Pod Autoscaler
Let us first take a look at the Horizontal Pod Autoscaler commonly called HPA. As you can see on the diagram below, it takes control of a Deployment or StatefulSet. These workload resources each use a ReplicaSet which is in charge of the amount of Pod instances that are running.
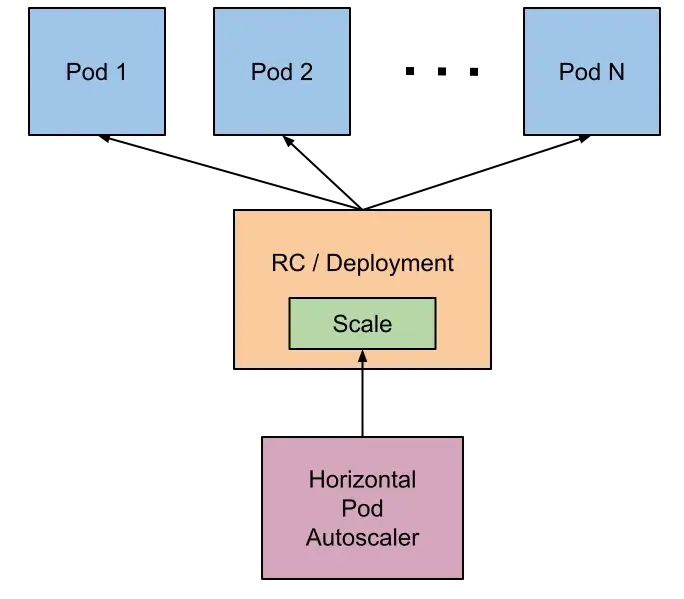
Horizontal Pod Autoscaler Design
The HPA is used to scale a workload based on resource utilisation metrics. The simplest way to create one is to use the autoscale command like below. This will create an HPA in your cluster targeting the deployment resource $name. It scales the application between a minimum of 1 and maximum of 5 replicas, targeting an average of 70 percent CPU usage. If this average utilisation is above or below the target, the amount of pods will be scaled up or down within the allowed minimum and maximum.

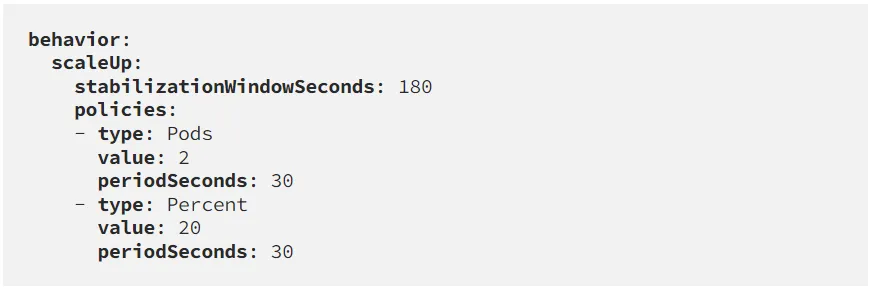
The scaling behaviour can be controlled with Scaling Policies, which limit the amount of replicas that can be scaled up or down over a certain period of time. This in combination with the stabilizationWindowSeconds property is especially useful to prevent 'Flapping', a common issue where the number of pods keeps scaling up and down because of spikes in the workload's resource utilisation. The stabilisation window is used to infer previous desired states and approximates a rolling maximum over the specified time period to prevent the scaling algorithm from removing pods only to recreate them moments later.
Below a custom behaviour from a Scaling Policy which prevents the HPA from scaling up more than 2 Pods or 20 percent of the current amount of Pods within a timeframe of 30 seconds. It uses a 180 seconds stabilisation window.
Cluster Autoscaler
As we've seen the Horizontal Pod Autoscaler can dynamically create and remove pods in the cluster, but this comes with a catch. Maybe you've come across this output before… Pending

No need to panic! When a Pod is in the Pending state, it means the Scheduler has not yet assigned a Node to it. This can be because it just wasn't processed yet, but most often there is a scheduling problem. To debug the issue use the following command.
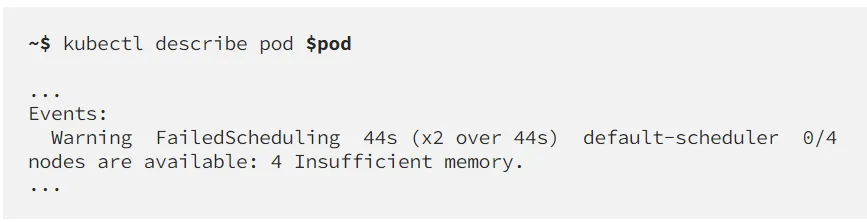
Somewhere under the events section of the Pod, there is a FailedScheduling event which tells us the Scheduler was unable to find a Node that had sufficient memory available to run your Pod. This is a very frequent occurrence when using auto-scaling on larger workloads.
The solution is to enable Cluster Autoscaling, which is an option in most managed Kubernetes environments like AKS, EKS, GKE etc. It will both up-and downscale the number of Nodes in your cluster based on the followingconditions:
- There are Pods which failed to start due to insufficient resources
- There are Nodes in the cluster that have been underutilised for an extended period of time and their Pods can be placed on other Nodes
The Horizontal Pod Autoscaler by itself will not save you any costs, as the amount of underlying used hardware stays the same. Cloud Providers like Microsoft Azure use a Virtual Machine for each Node, and you pay a monthly price for each one. Combining it with the Cluster Autoscaler is what can scale up the whole cluster when more resources are required, and scale it back down to save costs when the workloads are used less.
The Event-Driven Approach
In our experience, we found ourselves wanting more out of autoscaling. Why, you might ask, why is the HPA not enough. Well, the Horizontal Pod Autoscaler is great for one case: scaling continuously running applications which need to respond instantaneously such as an HTTP or gRPC API.
However, there are many other types of applications running on Kubernetes, applications that do not require continuous uptime and are inherently event-driven. Just to give a small example, here at Narato we currently have a product in development called Kapelli. It's a data-orchestrator used to gather, transform and process large data-streams. On a technical level, every type of data transformation is an Azure Function running on Kubernetes. Because this is a product focused on larger organisations, the total amount of these functions always ends up being high, mostly depending on their business needs. Maybe in a follow-up blog I'll cover why we're using Azure Functions on Kubernetes and our experience with them.
The load on these applications very often comes in large spikes, not necessarily batches but still not frequent enough to justify leaving them running all the time. Our clusters would have a large amount of Nodes just running idle, which is a large cost for both us and the customer. This is where the HPA cannot help us out anymore, as it does not allow us to completely scale down the data processors to 0 replicas. Scaling based on resource-utilisation is not smart enough. We need a mechanism that scales up (multiple instances of) a single data processor, based on the amount of messages in a single topic of a message queue. Yeah, that's quite a requirement isn't it.
Kubernetes Event-Driven Autoscaling
Like the title suggests, we are scaling our applications based on events that occur in- or outside our cluster. Kubernetes Event-Driven Autoscaling or better known as KEDA is an open-source project that will hopefully revolutionise the way in which you see scaling. To get started, let's install the tool on our cluster with the following commands. Make sure you have the kubectl and helm CLI's installed on your local machine.

KEDA consists of two major components:
-
Agent: activates and deactivates Kubernetes scalable workloads to scale to
and from zero instances when events occur. -
Metrics: acts as a metrics server that exposes event data like queue length
to an Horizontal Pod Autoscaler to control scaling beyond one or zero.
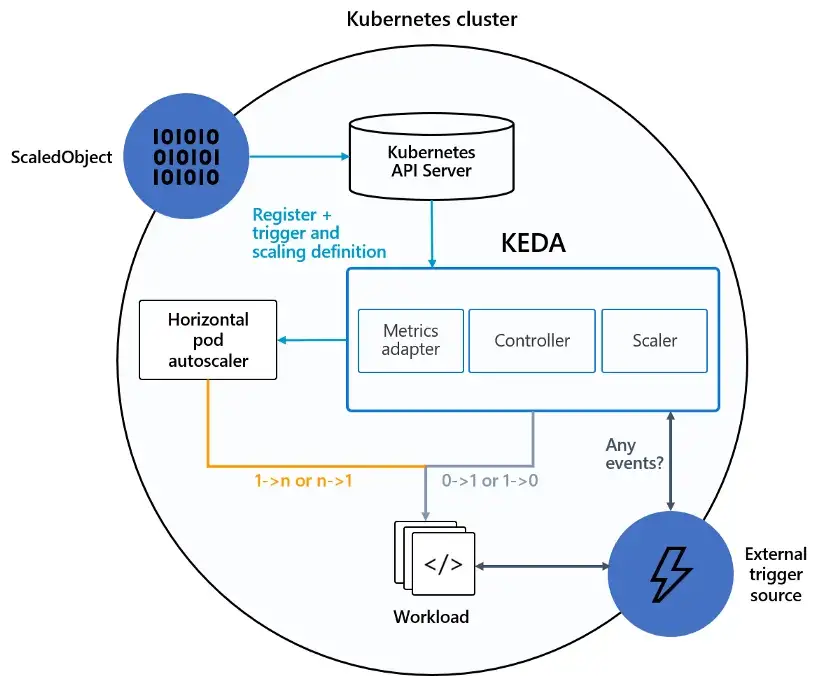
KEDA Architecture
It ships with a large amount of built-in Scalers that connect to your favourite data sources and even provides a new way for you to start scaling your workloads with custom autoscalers. In this blog, we'll just take a look at some of our favourite Scalers but check out External Scalers if you're interested in writing your own. One of the funnier demos I've seen is scaling your application based on the weather…
To get started with the event-driven scaling, we'll create a ScaledObject. This is a Custom Resource Definition provided by KEDA that consists of 3 things: the scaling target, triggers and an authentication method. The target is just the name of the Deployment/StatefulSet you wish to scale. The triggers are a list of Scalers that define how and when the workload needs to be scaled. Finally, the authentication is optional because not every Scaler needs to authenticate, but most often this will be a reference to a TriggerAuthentication resource containing secrets like connection-strings. If the connection-string is an environment variable in the Pods, it's also possible to just pass the name of this variable so that the Scaler can retrieve it dynamically.
Queue Triggered
The most relevant Scalers for our use case are the Queue Triggers, specifically Azure Service Bus as we are using Microsoft Azure as our Cloud Provider. Let's look at an example from the documentation.
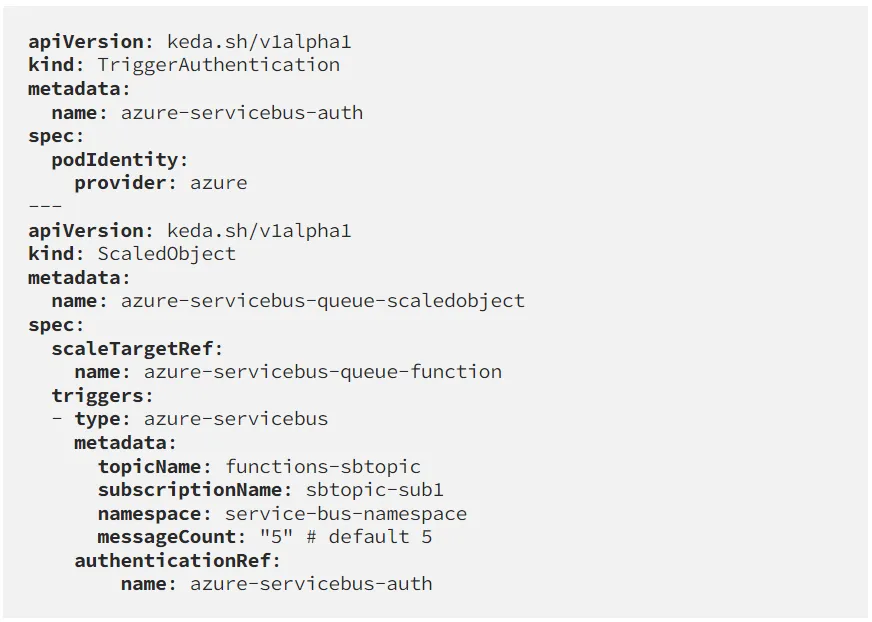
Here we first define a TriggerAuthentication that uses PodIdentity. This is a mechanism provided by multiple Cloud Providers like Azure, AWS, .. to defer the authentication to the Pods which use an Identity Provider native to that Cloud environment. In this way, each workload can have a separate set of access-policies for the usage of other cloud resources, in this case our Azure Service Bus, Azure KeyVault, etc. It's also more secure than relying on connection-strings.
Secondly, we define a ScaledObject. This contains the target reference to the deployment we are scaling, the list of Scalers and a reference to the TriggerAuthentication we just made. In this example we use a single Scaler of the azure-servicebus type, containing the topic and its subscription name as well as the namespace and a message count.
The message count is what will determine how much scaling is going to happen. Here, the message count is 5, which means that for each 5 messages after the first one that's in the topic, a new Pod will be created. The first message will always trigger the first Pod initialisation, because otherwise the messages won't be processed until there are 5 waiting in the topic. Of course, scaling up for such a small amount of messages is not realistic, make sure to define the amount yourself as this is the default value for this Scaler.
Below an example video of the Azure Service Bus Scaler in action. Definitely go fullscreen so you can read the output. On the upper-left side of the terminal you'll see the output of kubectl get pods which will show you the current amount of running Pods and their status. On the lower-left side you'll see the output of az servicebus topic subscription show where we can see the current amount of messages in the topic by looking at the activeMessageCount property. Finally, on the right side I'm running a simple .Net application that's creating a given amount of messages and sending them to the topic.
As you can see, at the start of the video there were 0 Pods running because there are no messages in the topic. For every 50 messages, a new Pod will be created. At some point, the cluster runs out of resources and some Pods enter Pending state. This is the point where Cluster Autoscaling should save the day and create new Nodes to accommodate the Pending Pods.
Azure Pipelines Triggered
Another one of our favourites is the Azure Pipelines Scaler, which allows you to create Pods based on the number of jobs currently waiting in an agent-pool. We use both GitHub and Azure DevOps for our projects. In our Azure cloud environments, all resources are behind VPN's, VNets, Firewalls, etc. This makes it difficult and impractical to deploy applications to Kubernetes clusters or even the Azure environments in general, that's why we use self-hosted agents for our Continuous Integration and Delivery workflows because they can be installed within the environments themselves. This allows them to communicate with the Kubernetes clusters and other Azure resources directly.
If we were to follow the classic approach, we would run multiple Virtual Machines which have Azure DevOps hosted-agents and all our tools installed on them. It would add extra maintenance and security concerns, not to mention that they would run idle for most of the time waiting for a developer to start a build or release.
KEDA to the rescue! Azure DevOps provides us with a Containerfile that uses the Linux install script to create a container-image. It installs all the required dependencies for the agent to start executing your Azure Pipelines. The true power is unlocked by combining this with the KEDA Azure Pipelines Scaler which as I mentioned before polls the Azure DevOps Server to check if there are any queue'd jobs, and if this is the case starts a Pod (the hosted-agent container-image).
I won't go into much more detail here, because in our experience the documentation is great. Just make sure you use a ScaledJob instead of a ScaledObject, because you want to run a single Kubernetes Job per Azure Pipelines Job. This requires some small tricks like the --once flag on the agent's container startup script to make sure that it only picks up a single job. Another caveat is that the agent-pool cannot be used to queue jobs when empty, and the ScaledJobs agents get removed automatically. The solution is to manually add an agent to the pool, stop it and disable it in the pool. Nobody said it needed to be a working/running agent 😉
Conclusion
KEDA really revolutionised the way in which we look at scaling within our Kubernetes adventures. It's not just technical, it can have a serious business impact and our customers see their monthly Azure bill go down every time we tweak our scaling parameters.
I hope this was helpful and inspires you to experiment yourself! Also, don't forget to star this wonderful project on GitHub.